Archive for April, 2012

Create a Custom Zunicore Template

With last week’s blog post “Installing WordPress on your Zunicore Cloud Server”, we introduced how incredibly easy it is to set up a CMS on a Zunicore Cloud server. We would like to take that even a step further and show you how simple it is to create the CMS as a customized template so you can build future Virtual Machines with a preconfigured CMS . With using a preconfigured CMS web server as a template, you can save the steps of configuring the machine, installing the necessary packages, and creating a new database.

After making the WordPress server, the next step would be to create a backup of the server. This ensures we have a known working copy of the VM stored in our Resource Pool. With a copy of our server stored as a backup, we can easily restore the server back to a known working configuration or even create a Template based off of this server.  A template of the server will allow us to easily provision a Virtual Machine with a pre-built Web server, database,  and CMS.

If you have already made the desired changes to your CMS, you will now make the backup. This can easily be done by clicking the ‘Create Backup’ button from the Disk tab on the Virtual Machine’s Detail Page.  For a more thorough walkthrough which covers backing up your Zunicore Virtual Machine, see our previous blog post “Server Backup”.

After you create the backup,  you are now able to create a Template based on that backup.  Below is an example of the backups listed for a Virtual Machine.  You can click  the ‘Convert to Template’ option to create the Template.

Once you select the Template Conversion button, you are then presented an option for naming the Template. Provide the Template a recognizable name so you can easily identify which Template to use for a provision. In this example, we will provide the customized Template the name: Blog Template.

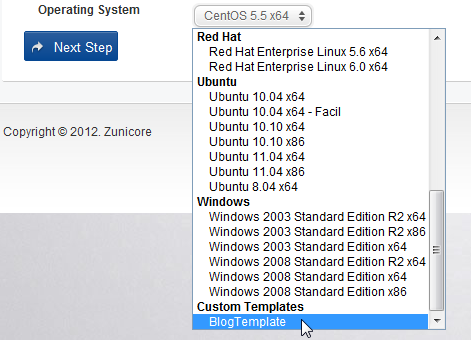
Now, when you create a new Virtual Machine within the same Resource Pool, you will see the new Template as an Operating System option underneath ‘Custom Templates’.

After the server is provisioned, you can open your browser to the server and use the WordPress wp-admin to begin managing your new CMS with the WordPress Dashboard.

Making a Template based off a customized Web Server with your desired configurations and options allows you to take advantage of the incredible control Zunicore provides.  You can easily provision a new Virtual Machine, create a CMS web server, backup the server, and then create the server as a Template for future provisions within a matter of minutes using the Zunicore Cloud.

Internet World 2012

If you are over in the UK, take a moment and head out to Internet World’s 20th anniversary celebration. The expo is one of Europe’s biggest and longest-running events covering digital business and has been held annually since 1992!

To get the best idea of the advancements we have enjoyed since 1992, you can see what was released to the public in that year and still has a resonating impact on the technology we use today:

Windows 3.1 was released by Microsoft

ATT makes a video telephone available for purchase with a $1,500 price tag

Microsoft releases Microsoft Works

Wow! That was a big year for change. But nowhere near the change Zunicore has brought to the cloud. We have made advancements beyond expectations and continue to lead the industry with the features, flexibility, and control you demanded.

Make sure to stop by the Peer 1 booth and  say hello to the  Zunicore team.

Installing WordPress on your Zunicore Cloud Server

We have a lot of web developers taking advantage of the Zunicore flexibility while building and hosting their sites on the Zunicore Cloud. Some of their design and site integration with Content Management Systems (CMS) is truly remarkable. Their ability to create, customize, configure, backup, and even create the server as a customized template really showcases how incredibly advanced these users are and how easy it is for CMS developers to maximize efficiency using the Zunicore Cloud.

However, not all of our users are familiar with building a Content Management Server and web developing using Php or MySQL. So, to provide further insight into how simple it can be to set up a CMS using our Zunicore Cloud, we wanted to show how quick and easy it can be.

You will first need to install the basic packages:

apache
MySQL
Php53
Php53-mysql
unzip
wget

These packages will allow you to build the CMS as a Linux web server and wget will retrieve the latest WordPress software.

#yum -y install mysql-server httpd php53  php53-mysql unzip wget


Make sure to turn on MySQL and Apache:

#service mysqld start; service httpd start

You will then need to make sure Apache and MySQL will start at run time:

#chkconfig httpd on; chkconfig mysqld on

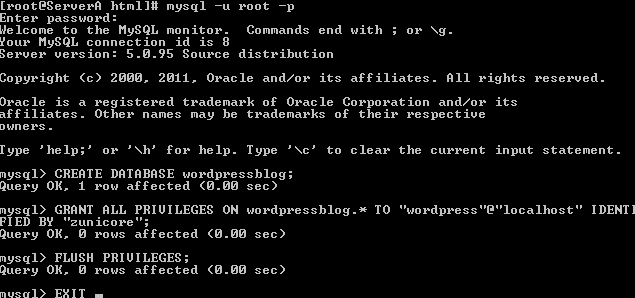
Now, you will need to create a database for your WordPress server:

#mysql -u root -p
mysql> CREATE DATABASE wordpressblog;
mysql> GRANT ALL PRIVILEGES ON wordpressblog.* TO “wordpress”@”localhost” IDENTIFIED BY “zunicore” ;
mysql> FLUSH PRIVILEGES;
mysql> Exit;

We use the below values for the configuration:

DATABASE name = wordpressblog

Username = wordpress

Password = zunicore

After you have created the database, change directories to /var/www/html. You will now download the latest WordPress package and unzip it in your directory:

#wget http://wordpress.org/latest.zip
#unzip latest.zip

Once this extracts, you can remove the download .zip and the unnecessary directory:

#rm latest.zip ; mv wordpress/* ./ ; rmdir wordpress

Now, you will need to make wp-content/uploads and wp-content/cache writable by your web server:

#mkdir wp-content/uploads wp-content/cache

#chown apache:apache wp-content/uploads wp-content/cache

Next, you will need to edit the WordPress configuration file. First, copy wp-config-sample.php to wp-config.php:

#cp wp-config-sample.php wp-config.php

Then, edit /var/www/html/wp-config.php :

#vim /var/www/html/wp-config.php

Change the WordPress values correctly to match the database name, user, and password that was created earlier:

DB_NAME = the database name (wordpressblog)

DB_USER = user name (wordpress)

DB_HOST = localhost

DB_PASSWORD = PASSWORD (zunicore)

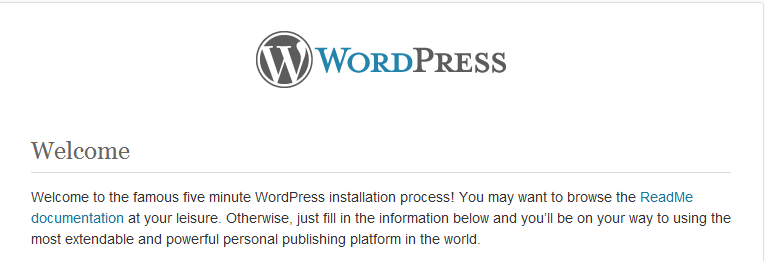
You can now complete the set up your of WordPress CMS. Open up your web browser and enter your IP address/wp-admin/install.php in the url field. You should see the WordPress Welcome message on your browser.  This will start the process of creating a WordPress admin, adding the site name, and a description to your site:


Once you are done, you will then be forwarded to your first ever CMS!

At any point of the installation you are not comfortable with setting up the CMS or you would prefer an even easier experience, Standing Cloud provides you with a  CMS of your choice and an incredibly easy, point and click install process all while using the Zunicore Cloud.

Backup your virtual server through ssh to another cloud server

We offer a number of awesome features  our users can take advantage of so they can experience the true flexibility and control we believe they deserve. However, sometimes , we have some server administrators that would really prefer to do some tasks only on the command line  and call it a day. And although we offer a number of simple to use, intuitive features to  make server administrating as easy as possible, they have become hard wired with preferring to  run a command or two to find the solution they need.

We recently added new backup features in our portal that would allow users to make on-demand backups, scheduled backups, restore the server from a backup created, and even make a customized template from a backup. And despite how incredibly easy  these features are, a handful of  our Linux users still prefer to run their run backups through cron or SSH to another server. So for example, if they had a server in the UK and wanted to make sure they had access to their files at any time regardless of the status of their server, they would backup the server through SSH to a server in Toronto.

Occasionally, Support will receive a ticket from a client curious on how to backup the server through ssh. And all though we recommend to all clients that they take advantage of our backup utility in the Zunicore User portal, we offer our users the following command for backing up a server over ssh :

tar -cvpzf backup.tar.gz --exclude=/backup.tar.gz --exclude=/proc --exclude=/lost+found --exclude=/sys
 --exclude=/mnt --exclude=/media --exclude=/dev / | ssh username@IPADDRESS "(cat >filename.tar.gz)"
 
  • tar    command to create the archive
  • -c    create a new backup
  • -v    verbose mode
  • -p    preserves the permissions of the files
  • -z    compress the backup file with gzip
  • -f    the  file name
  • -exclude=    which directories to exclude from the backup.  This can change depending what you would like to achieve and what directories you need backed up.
  • |    pipe the output of tar through ssh  which will then run the cat command on Server B
  • ssh    remotely execute cat on the remote server to create the file name
  • username    the account on the remote server with root priviledges
  • IP   Address    the remote server you are backing up  to
  • filename    the destination file name you wish to give to the new backup on the remote server

In the above example, we have backed up the entire ServerA (excluding mounted directories, lost and found, proc, and media) to ServerB. We provide the back up a distinguishable name we can easily search for when we need to find the file for quick reference.

Once the command has finished, you can log in to the backup server (ServerB) and check if the backup was copied over.

Private Net

We are proud to announce a  new network interface  feature for your Virtual Servers. The network interface allows you to have a Private Network between all of your resources in a Resource Pool. With a Private Network, you can take advantage of the new feature for increased security and bandwidth control.

The Private Network or ‘Private Net’ will allow your Virtual Servers to communicate privately with out any traffic leaving a Data Center. All traffic that is shared between your servers using the Private Network is 100% free and secure. This includes all uploads and downloads between your server using the Private Network.

For example, if you need your Web Server to continuously communicate with your Database Server, you wont have to worry about bandwidth budgeting and planning as long as they both share the Private Net.

To add a private network to your Resource Pool, you will need to either purchase the Private Net option during checkout or select ‘Modify Cloud Resource Pool’ and then add the Private Net feature to your Resource Pool.

For every existing Virtual Machine you want to add the new Private Network interface for, you will need to shut down the Virtual Machine. Once the Virtual Machine is shut down, you can then add the new Private Network interface.

To read more about how Private Network is a solution for you and how to enable Private Network  in our Zunicore Portal, log in now and read our Knowledge Base article Private Network  or open a chat now with an always available Zunicore representative.

Server Backup

At Zunicore, we understand at anytime while administering a server anything can happen. You could accidentally replace a directory, install a new package without thoroughly testing it’s impact on dependencies, or even overwrite an important configuration file. However, you can have peace of mind knowing Zunicore can get your server back online and restored within only a few clicks.

If you have purchased backup storage space for your Resource Pool, you can make a full backup of your server by selecting the ‘Disk’ tab on your Virtual Machine Details Page. You have the option to backup your server on demand and also to auto-schedule backups. Having the ability to backup your server on demand provides you the control you have come to expect from Zunicore while auto-scheduling your backups continues to meet your need for flexibility.

Once you have made your changes, installations, and configuration to your Zunicore server, click ‘Create Backup’ to instantly add the backup for your server. Now, if you need to revert your server to an earlier configuration, you can click the ‘restore’ icon to restore your server.

To read more about backups and your Zunicore server , log in now and read our Knowledge Base article Backup Virtual Servers and Template Creation


Twitter Updates

  • @PoonHealey Hello, We do not offer phone support for the Zunicore platform. You can get a hold of us with live chat. Live chat is av... 2 months ago
  • @artifaktCom Hello, An API will be available soon that will allow you to obtain this output. Right now, the API is undergoing signifi... 2 months ago
  • @jonathansuter Hello, We can reply back with any answers you need. Please update this with any questions that you have. 3 months ago
  • @RyanCorner Hello, We will forward this information to our development team. We will update this ticket when completed. 3 months ago
  • @beagile Hello, You would have to use the templates we offer. But if you spin up two VHDs on the server, you can always copy the data... 3 months ago
  • @indiejustin Hello Justin, Can you create a ticket in our internal system so i can verify you and then determine the issue of the VM. 3 months ago
  • @kangawallafox Hello Shaun. I am not seeing a ticket under your name. Please respond to the ticket via the user portal and we will respond. 4 months ago
  • @josephoenix Hello Joseph. Please submit a ticket to [email protected] stating you'd like to deactivate your account and we'll handle it. 5 months ago
  • @Open_Universe That is great to hear. If any assistance is needed, please let us know. Have a great day and enjoy your time in the cloud! 5 months ago
  • @Open_Universe If you can provide the email address that is associated with your account, we will create a ticket and inform you when ready 6 months ago

Follow

Get every new post delivered to your Inbox.